Showing posts with label Arts and DIY. Show all posts

Sunday, May 19, 2013

Artist Spotlight: Katie Pritzl

Hello dear readers! Today we have a very special Artist Spotlight post featuring one of my sweet friends, Katie Pritzl! I have known Katie for several years, and she is very talented artist, that works in a wide variety of mediums. Many of her pieces carry a lot of emotional weight and spark thought provoking reactions. While others have more of a quirky and whimsical presence. 

I currently have the pleasure of owning two of her wonderful creations; a painting and a mixed media collage. I was thrilled when Katie agreed to take part in an Artist Spotlight post on this blog! So without further adieu, it is my great pleasure to introduce Miss Katie Pritzl!


Where can your work be seen/purchased? 
Currently I have things on display at Blackbird Gallery in Nashville and the Franklin art crawl. I also have work on display at Happy Endings in Seattle for the rest of the month.

Do you have any on-line resources where you work is featured?
Pritzl Arts on Facebook and Etsy
What mediums do you work in? Do you have any that you prefer, or find hard to work with?
As of right now I mainly work in acrylics and love finding new ways to use mixed media & found objects. I'm staying away from oils for the time being just because of the cleanup that is required. I hope to try all mediums eventually.

What has been your most challenging piece to date? Was there a reason why is was so difficult? 
There is actually a rather large piece I still haven't completed and put aside for the time being, it was coming from a rather emotional place and I haven't quite figured out how to finish it yet.
Do you have a plan when you are working on a project? Or do you just 'let it happen'? I often start with a general idea and build off of that, letting most of the piece happen naturally. However some of the pieces that people love the most started as an absentminded doodle.
Is there always a definitive point when you know a project is complete? Have you ever had a piece that you were never really sure if its finished or not?
For most pieces I reach a certain point and know when it's finished, but there have been plenty of times when I've tortured something beyond recognition because I couldn't stop.
 Where do you most like to pull inspiration from?Anywhere and everywhere! Most often it comes from music that strikes a chord with me, I get images in my head and do my best to convey them for everyone to see.
Are you strictly an artist, or do you have any other professions/passions?
Art is my deepest passion, even my day job is at an art museum. I want to be surrounded by it as much as possible.

What are your future goals as an artist? Where do you want to see your art taking you in the years to come?I have plans for organizing and curating new art shows, specifically shows benefiting equal rights organizations and charities. I believe that it is possible to make the world a better place through art and I intend to prove it.


I want to say a huge thank you to Katie for taking the time to participate in this post! I love learning about my artist friends, and their creative processes. I have always admired Katie's art and I really enjoyed having featured in an Artist Spotlight post! This is just a small sampling of her work, so please check out her Facebook and Etsy to see her other wonderful creations! 

If you would like to be featured in an Artist Spotlight post please feel free to send us a note here!

All photos are c/o Pritzl Arts

Friday, April 5, 2013

At The Dog Park at The Franklin Art Scene!

Hello dear readers! I hope that all of you are having a spectacular Friday! Don't forget that At The Dog Park will be at the Franklin Art Scene tonight! We will be set up at 225 2nd Ave S in Franklin TN from 6 to 9PM. We are so excited to get to be part of such a wonderful event! So if you are in the Nashville are, please come and visit us at The Franklin Art Scene!
If you are not in the area or just not able to make it, never fear! You can always check out our Etsy shop! Our blog readers can use coupon code "CLOVER" for $1 off your first bag of Axle Bites!

Wednesday, February 13, 2013

DIY: Home Made Dog Treats

Sometimes its hard to find treats that I can give to my dogs. Axle has such a sensitive stomach that he has to be on a special diet, and can't have a lot of off the shelf dog treats. We are often in and out of the vet with him because of his tummy troubles. 

A lot of what causes his ailments are the over processed and chemical filled 'treats' that line the shelves of super markets and pet stores. I always have to be very careful when I'm trying out a new treat so I don't give Axle something that will upset his system. One way that I have found to help with this issue is making my own dog treats at home! This way I know exactly what I'm giving them, and I can easily avoid anything that could make them sick! 

I got this recipe from Bullwrinkle.com. I like this one because it is very simple and takes very little effort to make. And I usually have all the ingredients in my pantry already. The fact that there are so few ingredients makes me very happy to make these on my own. I don't know how many times I've gone to a pet supply store and picked up a bag off the shelf, only to be completely floored by the mile long list of ingredients on the back! Half of which I can't even pronounce. 

Now this may sound like overkill to a lot of dog owners. Most dogs I know can eat just about anything (including a lot of stuff that isn't even food) and it won't phase them. (Clover is this kind of dog) But when you have a dog that has food allergies you will go to great lengths to find them food that their delicate systems will tolerate. (Being so diligent about Axle's diet also saves me from having to clean up lots of ....erm... 'dog mess' .... later on.)

All you will need for this recipe is:
  • 2 cups whole-wheat flour 
  • 1 tbsp. baking powder 
  • 1 cup peanut butter (chunky or smooth) 
  • 1 cup milk

Pre-heat your oven to 375 F and combine all your dry ingredients in one mixing bowl. In another bowl mix the milk and peanut butter. If you like to keep your peanut butter in the refrigerator, you may want to separate out what you need for this recipe and let that sit out at room temperature for a few hours so it will be easier to mix.
 Don't forget to let the dogs lick the bowl!
 And the whisk!

After your wet and dry ingredients are thoroughly mixed you can now combine them in one bowl. Kneed this until it makes a dough. Lightly sprinkle some of your left over flower on some wax paper and roll the dough out to about 1/4 of an inch thick. You can use cookie cutters to make fun shapes or just tear off small clumps of the dough (just like regular cookie dough) and put them onto a greased (or tin foil lined) cookie sheet. 
Bake for about 20 minutes. Check ont them regularly, these cookies can go from done to burnt really quickly. When they are lightly brown take them out of the oven and let them cool completely before you give them to your dog. Store in an air tight container. 
And that's it! Simple huh!? And I'm sure your dogs will love them! Sensitive tummy or not, this is a great, simple little recipe that all dogs will love! And you can be happy knowing exactly what you are feeding your pooch! You could even decorate them for a special occasion using dog safe icing
Do you have and doggie friendly recipes that you love? Any you have always wanted to try? Do you have any words of wisdom for caring for a sensitive stomached pup? Please share with us in the comments below! We love learning about all of you and your sweet doggies!

Friday, January 25, 2013

Local Arts: The Franklin Glassblowing Studio

On Monday Paul and I took a glass blowing class at the Franklin Glassblowing Studio. We love taking all sorts of local art classes whenever we can. We have done a few cooking and painting classes, and even a stained glass window class. But we have never done something like this before, so when I saw that there were glass blowing classes close by, I signed us up! 

The Franklin Glassblowing Studio is a great little gem in the heart of Franklin Tn. It is run by José Santisteban. He has been a glass sculptor for many years, and has just recently started to offer classes. 


 These are just some of the work for sale at the studio. Every piece is one of a kind, and all of them are very beautiful. All the different color combinations are amazing!

 This is the oven that is used in the heating process. This thing was about a million degrees!! I could not believe how incredibly hot this thing was. And we were about to be standing in front of it sculpting molten hot glass. And after a quick demonstration the class was under way!
 I was a little apprehensive about the whole process, so I asked Paul to go first. I'm no stranger to burning myself by accident, so I wanted to make sure I was okay with all the steps involved before it was my turn.
Paul blowing air into the molten glass to shape it. This apart was really hard to do! We had to wear heat resistant arm guards so we would't get burned. I was prepared to wear a welding mask after watching this!!
 José showed us how to use the steel table to shape the glass and add a swirling effect to the colors.
 After shaping the 1st layer we added another layer of clear glass over it. This lets more light through the finished piece. Here is José clipping off the excess! This was amazing to watch! I can't believe how easily José was able to handle the molten glass!
 Paul posing with the Jacks (a shaping tool used in the sculpting process.)
 This part was really cool to watch! While José blew more air into the Punties Paul shaped the top of the glass orb with the Jacks.
 This was Paul's final piece! They have to cool down and dry in a special kiln for about 18 hours before they are safe to handle.
 José then added a loop of glass on the top so that it will be easier to hang when its ready.
 Next it was my turn! I was still a little worried about getting burned, but I was excited about getting started. Here José is helping me add crushed colored glass to my piece. He had to help me because I could not lift the Punties by myself! That thing was really heavy! And you have to hold it from the opposite end so you wont get burned.
 My glass orb after adding color!
 Back in the oven!!
 Time for a little shaping! Mine started to get a little wonky in the middle, so I had to do some adjusting.
 Using the Jacks to knock the orb off of the Punties. This Part was a little scary! You have to hit it pretty hard for it to break off. I was afraid that the whole thing would break! But it turned out just fine!
  José added a loop to mine as well! The swirling colors are so pretty!


We had such a good time taking the glass blowing class! And I can't wait to pick up our glass orbs on Saturday! I promise I'll share pictures of how they turned out. Have you taken an art/craft classes lately? What did you make? Any favorite or least favorite projects? Share with us in the comments below!

Wednesday, January 9, 2013

Wedding Location Scouting

This past Sunday Paul and I traveled out to one of my best friends Rachel's, parent's farm to scout  out our wedding location. (We got engaged on the 28th of December, yay!) We brought Axle and Clover with us so that they could run around on the farm with Rachel's two dogs Athena and Bella. Paul and I were so excited when they offered to let us have our wedding on their farm! Rachel took us on a tour of the whole place, and I took a bunch of pictures so we could decide where everything will be set up. And of course the dogs made their way into most of the pictures, haha!

 This is the field that we would section of for people to park their cars.


 Their super looooong driveway. Its at least a half mile from end to end.

 After our guests park, they would travel a short distance up the hill to where the barn is.

 First view of the barn.


 Clover was completely infatuated with this horse, affectionately named Blob. She followed him all over the farm.
 Close up of Blob, he is such a sweet old horse!
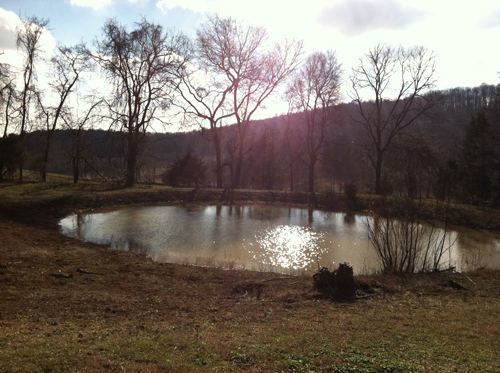
 This is the pond that will be the back drop for our ceremony. We are planning on building a sort of lattice arch to stand under when we say our vows. We are having the wedding in the fall, so the trees will be very colorful.
 The flat field in front of the pond where we will be setting up seating for everyone.

 The view farther away from the pond, complete with the dogs running in to the water. Axle swam all the way to the middle of the pond a few times. He loves the water!


The dogs loved the pond!
 Axle and Bella racing up to the barn.
 I love the way the sunlight sparkles on the water, its going to look so pretty in the fall.

 We are planning on starting the ceremony at dusk, so our vows will be said just as the sun goes down.
 Axle and Bella running in the field.
 Rachel's dog Athena is so pretty!
Sweet Bella!

 Clover and Athena!
 Axle licking his chops.
 The view through the barn, I think that's Clover standing at the end.
 Axle and Bella.
 Axle found a log to play with.
 Another view of the field, the pond is off the the left. It has a slight slope towards the pond, so it will be somewhat like 'amphitheater' seating. 

 This is a tractor wheel that they use as a fire pit! We are going to use this along with a few portable fire pits during the reception/after party. We are having sort of a 'camping theme,' complete with a S'more bar! (This was Paul's idea!)
 The dogs running out of the woods.
 Eventually we found the rest of the horses while ridding around on the four wheeler.
 The horses got annoyed with the dogs and chased them out of the woods!
 The back field.
 Clover got chased into the woods by the horses and ended up getting lost for about five minutes. We found her pretty quickly though. She loved the horses... they just didn't like her very much, haha!


 Before we left, the horses made their way back up to the the barn, so we walked over to say hello.
 This is Rachel's horse Black. I will be ridding him in at the beginning of the wedding. That's the plan anyway. We'll have to see how he feels about it!
 After all of our fun Axle and Clover needed to be hosed off because they were completely filthy. We all had such a great time and could not be more grateful to Rachel and her family for letting us get married on their beautiful farm. Paul and I are so happy to have our wedding on such a wonderful property! We have a lot more to do before the big day in November. But we will keep you updated with the planing process!!

Have any of you had farm/outdoor weddings? What did you do on your big day? Do you have any advice or suggestions you would like to share? We would love to hear your stories in the comments below!!